Wednesday 25 April 2012

Kung Po Chicken

My husband loves Chinese food and if both his jeans waistband and I would allow it, he would eat it every night for dinner.  Surprisingly this dish was a new one even on him and thankfully being home made is at least slightly healthier than the takeaway.  Trying to find a definitive recipe for Kung Po chicken on the internet was, predictably some might say, not an easy task. I was also hampered by not actually owning a wok and my one available frying pan being used for Ken Hom's egg fried rice (see earlier blogpost, I am now almost addicted to this stuff). It was also a weeknight meal so there was no way I was going to spend hours faffing about buying new ingredients I would use once in a blue moon, chopping, flavouring oil, deep frying etc.  In the end I took a few recipes I liked the look of and then combined them to make my own.  I was expecting it to be passable but require lots of tweaking but actually it was really quite good.  It wasn't a dish with a great deal of sauce and if that were a problem it would be easy to increase the quantities.  I know that no Chinese person or someone who knows anything about Chinese cookery would recognise this dish but we're pretty happy with it in my house and if anyone has a more authentic recipe they use please let me know.


Ingredients:

Two chicken breasts, diced
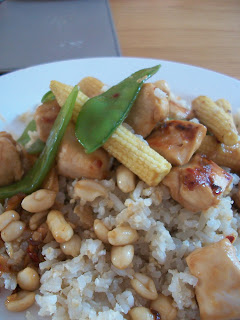
Vegetables knocking around in the fridge (in this case, mange tout, baby sweetcorn and a mushroom)
45g peanuts (non salted!)

For the marinade:
1 tbsp white wine
1 tbsp soy sauce
1 tbsp sesame oil
1 tbsp corn flour mixed with 1 tbsp water
2cm piece of fresh ginger, chopped.

For the sauce:
1 tbsp white wine
1 tbsp soy sauce
1/2 tbsp sesame oil
1 tsp white vinegar
2 tsp brown sugar
1 tsp chilli flakes
1 tsp garlic oil
2cm piece of fresh ginger, chopped.
Serves two

Mix together the marinade in a bowl, add the diced chicken and leave in the fridge for at least one hour.
Once the chicken has marinaded, heat the ingredients for the sauce together slowly. When the sauce is hot, add the peanuts and simmer for around 10 minutes.
Sauté the chicken and towards the end of the cooking time add the vegetables.  Once cooked, add to the sauce and simmer together for a minute or two.
Serve with egg fried rice and groans of happiness! 

Sunday 22 April 2012

Salted caramel shortbread

I first tried to make this last week after seeing this blog post and it went disastrously wrong.  I should have worked out that it would as it involved a) pesky conversion from American measures and most importantly b) a sugar thermometer.  I own a hell of a lot of kitchen paraphernalia, too much if you ask my husband, but one of those little blighters is not among the masses crammed into my cupboards.  I've never needed I one for making caramel so it didn't seem too important at the time. It all looked fine, looked like caramel and then in the flash of an eye it turned really dark, scary dark.  Out of nowhere.  Then due to what I can only describe as pathological clumsiness I proceeded to throw the saucepan of boiling hot sugar everywhere, namely all over my hands.  I won't repeat what I said but it really hurt.  My cries of pain could clearly be heard all over the house as the husband rushed to my aide and swiftly dunked the aforementioned limbs into cold water and then looked helplessly over the now solidifying toffee all over the kitchen.  I could do nothing but look a combination of pitiful and sheepish.  
Fast forward one week and now having full use of my hands again I decided I was not going to be beaten by salted caramel shortbread.  Macaroons had already defied me and there was not room for one more dissenter in the ranks.  I decided to wing it which is what I should have done in the first place.  I know how to make shortbread and I know how to make caramel, this should have been over a week ago rather than heading for round two. This time there was no injury to report, although I am having trouble typing this having burned my left hand on the oven earlier today.  I really am a waking disaster area. I may have slightly burned my caramel (it really does happen frequently) and have dark flecks spreading throughout but it tastes awesome and isn't really that unattractive so I'm happy.    It ain't too pretty but it is tasty:


Shortbread:
185g unsalted butter
80g caster sugar
270g plain flour


Caramel:
397g can of condensed milk#
50g light muscovado sugar
50g butter
1 tsp ground sea salt plus extra for sprinkling on top


Makes 20 small squares


Grease and line a 6in x 8in baking tin. Preheat the oven to 180 degrees.
Cream the butter and sugar for the shortbread together.  Then add the flour and bring together into shortbread crumbs.  Press into the tin and chill in the fridge for 15 minutes.
Bake the shortbread for 15-20 minutes until slightly golden on top and put to one side to cool.
For the caramel heat the condensed milk, butter, sugar and salt together on a very gentle heat until the sugar is dissolved and the butter melted.  Then bring to the boil.  The caramel needs a lot of stirring but take it from me you need to be really careful as it's getting hotter.  Once the caramel has boiled lower the heat right down and simmer for 2-3 minutes.  Pour immediately onto the shortbread, add extra salt on top and leave to one side to cool.


Eat with tea and glory in not making a mess of yourself and the kitchen. 

Friday 20 April 2012

Cheese Risotto

Cheese really is one of my favourite foods and when I was leafing through some of my cookbooks this week I spotted a couple of risottos made with cheese and thought I would give it a go. Most of the recipes required fontina cheese which I really cannot find near me so I improvised heavily and I doubt any Italian would call this a proper risotto so I was a bit nervous about the combination but was really pleased with the result. It was cheesy and oozy but not too overpowering, really filling and comforting. As usual I forgot to check my ingredients before I started and was a bit short on parmesan so I used what I had and next time would use more like 50 grams.


Ingredients:


150g arborio rice
1 - 1 1/2 litres vegetable stock
30g strong cheddar cheese
30g emmental 
30g parmesan plus extra for sprinkling
30g butter
100ml white wine
Serves 2


Melt 20g of the butter in a saucepan and then add the rice, coating it in the butter. Add the wine and cook until mainly absorbed, stirring frequently.   Add the stock a small amount at a time, stirring frequently and adding more once it has been absorbed.  Each risotto seems to take a different amount of fluid, add until the rice has softened.  This should take no longer than 20 minutes.  Once the rice is cooked, stir through the remaining butter and the cheeses with some salt and pepper.  The residual heat of the rice should melt the cheese.
Sprinkle some additional parmesan over the top and serve. 

Thursday 19 April 2012

Finally a photo...

I caved in to my co-workers' requests this week and made another batch of cheesecake brownies.  This time I photographed them so that you can see their beauty too!

Wednesday 18 April 2012

Escalopes

When I was growing up my mum was not the world's best cook and often dinners were of the ready made variety from the freezer*.  One of my favourite things that she put in front of us was chicken escalopes with cheese and ham covered in breadcrumbs.  They came out of  a packet and I dread to think how shockingly bad they were for you but this was the eighties before the food revolution and I didn't know any better.  Plus they really were very tasty.  Sometimes we would have a little variety and have turkey instead of chicken but the important thing was that it was a thin piece of meat covered in a slice of processed ham with some cheesy ooze all deep fried in breadcrumbs and then cooked in the oven.  Thanks to Tessa Kiros' awesome book Apples for Jam (which I am still going on about) I could recreate this little piece of nostalgia. I used chicken instead of beef as in the original recipe and cheddar rather than fontina which I cannot find anywhere.  Seriously, nowhere.  The original recipe was for four which I halved for two. The bechamel ingredients make more than is needed but it's hard to make much less.  


2 large chicken breasts
2 thin small slices of cheese
1 slice of ham, halved
Flour for dusting
1 egg, beaten
30-40g dry breadcrumbs
20g butter
2 tablespoons olive oil


Bechamel Sauce
20g butter
1 tablespoon plain flour
125ml milk


To make bechamel sauce, melt the butter in a small saucepan.  Add the flour and then put back on the heat for a minute or so, stirring all the time.  Gradually add the milk, whisking as you go.  When all the milk is added you should have a thick, smooth sauce.  Add salt and pepper and cook this for about five minutes to get rid of the floury taste.  Leave to one side to cool slightly.  
Beat the chicken breast out between two pieces of cling film using a rolling pin to get a flat piece of meat about 2-3mm thick.  It needs to be thin in order to cook in time but too thin and you won't be able to use it. If in doubt, I would err on the side of thickness.  
Put a slice of cheese on one side of each chicken breast and the ham over the this.  Spread some of the bechamel over the slices of ham leaving an edge of ham free from sauce.  
Fold the other half of the chicken over the bechamel and press the edges together.  
Put the flour on a wide plate and season.  Here you need an assembly line with a plate of flour next to a plate with the beaten egg on and then finally a plate spread with the breadcrumbs.  You put the chicken onto each of these plates in turn making sure you have both sides covered in each coating.
Heat the butter and oil in a non stick frying pan until sizzling.  Add the escalopes and fry until they are deep golden.  Turn over and cook on the other side.


The escalopes shouldn't need long as the meat is only thin but if you are worried or they are starting to burn then finishing them off in the oven is no great sin.  The original recipe doesn't say this but it's what I did and the meat didn't suffer at all.


Serve immediately to greedy people regressing back into childhood.


*I should add my mother is now a brilliant cook who never had the time with a part time job and two demanding and fussy children to feed every day.  She didn't even pay me to say that.

Sunday 8 April 2012

Easter cupcake strife!

 Every time I ask anyone what they want me to bake the answer is cupcakes.  I have really come to hate making them for other people.  Baking a batch for just me and the husband is fine because if they don't quite look right it doesn't matter as we're just going to shove them in our mouths anyway.  But other people expect cupcakes to look good and frankly mine don't.  Whether it's a lack of skill, patience or creative talent I don't know but they never seem to sing.  Feelings of dislike have been awakened this weekend as I was asked by my mother in law to make some for my brother in law's new girlfriend's birthday.  Being Easter weekend they had to have a seasonal theme so I turned Jamie Oliver's Velvet Cupcake recipe into an Easter cupcake nest type thing.  It was all going well as the cakes went in the oven, the mixture was really smooth and velvety and really easy to work with.  I wasn't boosted with confidence because things always go well with the cake itself.  The problem is in the decoration, they looked really good in my head but didn't quite turn out that way.  For topping the cupcakes I used a chocolate frosting recipe I've had written down on a piece of paper for ages and I can't remember where it came from. It calls for melting chocolate with milk and butter and then beating in icing sugar. It's really tasty but quite temperamental.  First it was lumpy and required quite strenuous whisking (not by me, these jobs are the domain of the husband) and then the consistency wasn't quite right so it started running all down the sides of the cake which is never a good look.  After leaving the frosting for ages so that it started to set, it sort of redeemed itself and went on the cupcakes without dribbling everywhere.  They're not all pretty though.  The husband isn't too upset as the ones with the dribbly icing have been designated as not passing quality control and he gets them all to himself.  With some careful positioning, I managed to make one of them look photogenic:


Happy Easter!

Thursday 5 April 2012

Snickerdoodle blondies

Last weekend was my friend Liz's birthday and she held a tea party to celebrate.  Liz is an incredible baker and her cupcakes are always beautiful and for her party she requested people bring cake.  This presented me with a bit of a dilemma as my baking is nowhere near as attractive as either hers or her friends and no one wants to go to the effort of making cake to be spectacularly upstaged which ruled out any form of cupcake.  I wanted to stick with something that could be cut into individual sizes just in case something went wrong and then I found these and the decision was made.  I'm a big fan of Americana when it comes to food and had been dying to try snickerdoodles for ages, mainly because of the name I have to admit.  This recipe seemed sufficiently cakey to pass muster but was still something different and interesting. Just to be on the safe side I also made a batch of homemade sausage rolls knowing I would gain points for this with the birthday girl and her husband! They may not have the exquisite look of a stack of beautifully iced cupcakes but they looked pretty good to me 


They are a little bit thicker than probably they're supposed to be as my baking tray is short and deep but I love the idea of blondies and these are really addictive so may invest in a better sized baking tray. 

Sunday 1 April 2012

Simnel Cake

It has become an Easter tradition at work that I bake a Simnel cake.  This benefits me greatly as I can use up the last of the dried fruit that I have in the baking drawer leftover from making Christmas cake (also something of an office tradition).  I don't like fruit cakes so my colleagues provide willing test subjects.  I always use the recipe in Nigella Lawson's 'Feast'.  It may appear from this blog that I'm a bit of a Nigella addict which may have some truth to it but I use her recipes generally because they are really easy to follow and understand and also very forgiving if things don't quite work, which happens quite often in my kitchen. Such as this time when I realised as I was about to decorate that I only had half the required marzipan.  Aside from  being a bit thin on top, it doesn't seem to suffer from a lack of it. Below is this year's offering, it would be traditional to burnish the top with a blow torch but neither owning one nor trusting myself with it even if I did means mine stays pristine yellow.